If you spend a lot of time on the computer,
you could soon find yourself suffering from hip pain.
The problem is usually related to how you’re sitting (or standing) while working, so in this post, we’ll look at what happens to cause the pain, how you can prevent it, and what to do to ease any pain you may already be experiencing.
(Note: This article doesn’t address arthritis or hip injury problems—this is strictly about hip pain that occurs after working at the computer for hours.)
What Causes Writing-Related Hip Pain?
Hip pain that occurs during or after writing is almost always related to the muscles around the hip, not the hip joint itself. Hip joint problems can occur, but they are caused by the degradation of the cartilage between the bones (osteoarthritis) or by inflammation surrounding the joints (rheumatoid arthritis or injury).
As long as you don’t have any of these arthritic conditions, assume your pain is coming from unhappy muscles, tendons, and ligaments. Another way you can tell is to determine where the pain is located.
If you feel pain on the outside of the hip and upper thigh or even in the outer buttock, that pain is related to muscle and tendon issues. Hip joint pain is usually felt on the inside of the hip and toward the groin area, and sometimes down in front of the leg toward the knee.
The muscles and tendons surrounding the hip joint provide the support for that joint and enable you to move. The problem is that writers don’t move them very often! We tend to sit or stand for hours at the computer, causing the hip muscles to become tight and short. They then pull on other muscles—like your lower back and other leg muscles—causing pain.
Other Things That Go With Hip Pain
It’s common for hip pain and back pain to go together. Sometimes, you may experience back pain and think it has something to do with your back muscles, when it may have a lot more to do with your hip muscles.
It’s also common for tight hips to be connected to tight inner thighs and weak outer thighs, which can pull the knee in and cause knee pain. If you notice pain on the inside of the knees after writing for a while, this could be the reason why.
Of course, we can’t forget the booty! Tight gluteal muscles—caused by too much sitting and too little climbing or squat exercises—can pull at the thighbone where they attach, causing that outside-of-the-leg pain.
All of these instances describe “muscle imbalances,” in which the muscles that are supposed to work together are actually fighting each other. Muscles always work in pairs to create movement, with one contracting and one expanding to allow you to move as you wish. A muscle imbalance occurs when one of those pairs is tight and short, and the other is weak and stretched. If this occurs anywhere in the body, it causes pain.
Indeed, the most common cause of outer hip pain for writers is most likely tendinitis. The tendons (fibrous bands of tissue) that connect the gluteal muscles in the buttocks to the hip bone become inflamed, often because of muscle imbalances. Most of these develop because of a lack of activity, poor posture, crossing your legs, or simply failing to keep your muscles strong and flexible.
What Does Writing-Related Hip Pain Feel Like?
If you’re suffering from writing-related hip pain, you probably know it. The pain occurs on the outside of the hip and tends to exist in a chronic, achy state. It’s usually not a severe pain, but a dull aching type that wears on you over time.
With this type of pain, you may also find that it’s harder to get comfortable when lying on your side, or when you sit cross-legged. You may have related muscle pain in the lower back and perhaps the knee as well.
The pain can get worse if you don’t address it, and may spread to other areas, so take this as a warning that it’s time to change your habits!
3 Ways to Avoid Writing-Related Hip Pain
Usually, when we think of setting up an ergonomically healthy workspace, we concentrate mostly on the arms and wrists and lower back. That’s all good, as these areas are at risk of injury, but it’s also important to check to see how your set-up may be affecting your hips.
1. Invest in a good office chair.
 Even if you have a standing desk, it’s not good to stand all the time. You need to rotate between standing and sitting, which means a supportive chair is necessary.
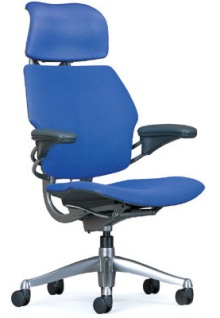
For good hip health, make sure your chair swivels so you can turn as you need to (without putting pressure on your hips), and look for one with a flatter cushion rather than the popular contoured ones that come up on the edges. (Example at right.)
Contoured seats put more pressure on your hips than flat ones, as the sides of the chair press into the hips. Look for one that has a flatter shape to it, though of course you still want good cushioning.
Once you have your supportive chair, you want to tilt it to lower the stress on your spine and hips. The typical 90-degree angle that most of us were taught to sit in—where you create a right-angle shape between your torso and thighs—puts pressure on the hip joints and muscles.
If you’re experiencing hip pain, reduce that pressure by:
- Moving your knees apart
- Opening up the hip angle
Moving your knees apart is easy, but how do you “open the hip angle?” The easiest way is to simply adjust the height of your chair so it sits higher up. You do want to be sure you can still put your feet flat without creating pressure on the back of your thighs. If you can no longer do that, add a footrest to your setup.
You can also try sitting on a tall, stool-style chair so that your knees are positioned a bit lower than your torso.
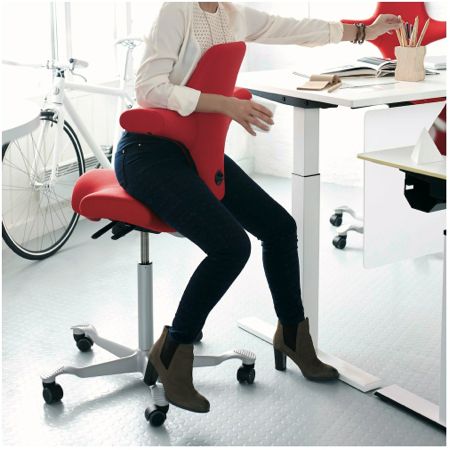
Those who are suffering from hip pain may want to try a “saddle chair, as it encourages you to allow the hip angle to open up a bit. HAG makes a cool saddle seat (below) that you sit in backward. It’s much friendlier to your hips and lower back.
2. Wear supportive shoes while standing.
If you use your standing desk a lot (like I do), makes sure you’re wearing supportive shoes while doing so. This will help keep your body in alignment, whereas if you’re just working in your socks or bare feet—particularly if your foot pronates or supinates—you’ll be putting extra pressure on your hips the entire time you’re standing.
A good supportive shoe will keep your foot in proper alignment and provide extra cushioning to increase your stamina. Use an anti-fatigue mat to prevent hip pain, back pain, and knee pain.
3. Get up and move around more!
This is the best thing you can do not only for your hips but for the rest of your body too. Set a timer and get up every 30 minutes. (You can also use apps like Stand Up! and Time Out to help you remember to get up.)
Then take at least five minutes to walk around, stretch, and perhaps perform a few exercises before you go back to work. The more often you do this, the less your risk of chronic pain.
Exercises to Help Prevent and Treat Writing-Related Hip Pain
Whether you’re already suffering from hip pain or just want to prevent it, the following exercises will help.
1. Seated Pretzel
Sit up straight in your chair and rest your left ankle on your right thigh above your knee. Place your hands on your thighs, then keeping your spine straight, hinge forward from the hips until you feel the stretch in your left hip and buttock.
Hold for 10-30 seconds, then return to the starting position. Repeat 2-4 times, then switch legs.
2. Bent Knee Hip-Flexor Stretch
Kneel on your left knee and angle the right leg in front of you. Your left knee is on the ground, the foot flat out behind it. The right foot is forward, the knee slightly bent. Shift your pelvis forward and bend the front knee until you feel a deep stretch in the left hip.
As you bend forward, your knee should come into a 90-degree angle. (Don’t let the knee go past the toe.) Hold for 10-30 seconds, then repeat 2-3 times. Switch legs.
3. Butterfly Pose
Sit on the floor, bend your knees, and bring the soles of your feet together in front of you. Press the knees down into the ground as far as you can and hold for 10-30 seconds. Raise the knees, relax, then repeat 3-5 times.
4. Cross-Body Stretch
Lie down flat on the floor with both legs extended straight out. Slowly bring your right knee into your chest, keeping the left leg straight down on the floor. Place your left hand on the outside of your right knee, then gradually pull that knee across your body toward the left.
Try to keep your right shoulder as close to the ground as you can, moving only the leg from the waist down.
Pull the leg until you feel the stretch in the hip and lower back, then hold for 10-30 seconds. Release and repeat on the other side. Perform 3 repetitions.
5. Hamstring Stretch
Tight hamstrings can contribute to tight hip muscles, so simply stand up straight, then gently fold forward from the waist while keeping the legs straight. Keep folding down until you feel the stretch in the back of the legs.
Touch your toes if you can, but remember to keep your legs straight. Hold for 10-30 seconds, then repeat 3-5 times.
6. Pigeon Pose
If you do yoga, you know this pose, but even if you don’t, you can still perform it.
Start on all fours, then bring your right knee forward in between your hands, sliding your right heel just under your left hip. Extend the left leg straight behind you. You should feel the stretch in your right hip. If you can, slowly lower your chest toward the floor. Hold for 10-30 seconds, then repeat on the other side.
7. Piriformis Stretch
This stretch focuses on muscles deep in the buttocks, which when they get tight, can lead to lower back and hip pain. (Read more about pain coming from this muscle in our post, “How to Heal a Writer’s Literal Pain in the Butt.”)
Sit on the floor with both legs extended in front of you. Cross your right leg over your left, and place your right foot flat on the floor on the outside of your left knee. Place your right hand on the floor behind you, and press your left elbow against your right thigh.
Now using that elbow, press and twist your torso to the right, being careful to keep your spine straight. You should feel the stretch in your hips, buttocks, and lower back. Keep pressing and twisting until you reach your limit, then hold 10-30 seconds and release. Repeat on the other side, for 2-3 reps each side.
8. The Frog
This one will reveal any tight hip muscles you may have. Be careful as it can be intense—go only as far as you can.
Start on all fours with your knees directly under your hips, then gradually move your knees apart while keeping them in line with your hips. Spread them as wide as you can, keeping your feet behind your knees. When you’ve reached your limit, gently lean forward onto your forearms. Hold for 10-20 seconds, and if you can, move your hips back and forth a bit to bring the stretch to varying muscle groups.
See more information on how to do this stretch on the video below, although notice that he does keep his feet together rather than apart.
The second video below shows you how to do the frog with the feet apart. Be careful and move slowly.
Do you suffer from writing-related hip pain?
I’ve been here, too. Great tutorial and suggestions.
The exercises can help, but for me, the most effective activity is a 15-minute floor routine that strengthens core muscles and improves alignment (preventative and relief). Find the book (The Core Program, by Peggy Brill, PT) on Amazon.
Thanks for the tips, Dee! :O)
There were lots of helpful tips and demos in this posts. I have felt the pain you are referring to and I appreciate the help here.
Good luck banishing that pain, Andrea. :O)
Sadly, some of us older folks, especially those who’ve had knee replacements, can’t do most of these exercises. I’m still okay with #5, but any of the stretches I do have to be on my back or sitting…and done on a bed or exercise table/bench. One of the most useful I’ve found for lower back pain caused by hip tightness is to lie flat on my back and alternately stretch each leg very slowly as far as it will go. I feel that in my hips and lower back muscles, and can also tell which hip is the one that has tightened up.
A gentler version of #1 can also be done lying on the bed easier than in the sitting position, but be mindful of the knee if you have knee problems.
Thanks for the tips, Pat. Yes, you can do #2 lying on the floor too–may be a little firmer support. I’m thinking you could modify #4 as well by simply keeping the leg straight (to avoid straining the knee), and lifting and crossing over.
Pat, check out Peggy Brill’s book, THE CORE PROGRAM. It’s written specifically for women and the movements can be done at any age and are even adaptable for movement restrictions.